Crypto can often seem overly complex and challenging to navigate. Hence, the purpose of this article is to provide you with the skills, knowledge, and confidence to venture into the world of decentralised finance.
But first, let’s take a look at what decentralised finance is? Decentralised finance or DeFi refers to the process of taking financial applications and removing the highly centralised entities which often control them in traditional markets. DeFi allows crypto holders to put their tokens to use, enabling them to become the first movers within the global financial shift to decentralisation.
One of the most important questions to ask within the crypto-sphere is asking ‘why’. Why should I participate in DeFi? To answer this crucial question, allow me to provide an example.
Picture a world in which there are two groups of people, those who own apples and those who own oranges. To trade between these assets we would need to create an apples/oranges trading pair. To facilitate the buyers and sellers within this system we must always ensure there is enough liquidity to soak up both buyers and sellers trading volume simultaneously. If a trader wished to convert their 100 apples to 100 oranges but there is only enough liquidity to allow 50 apples to 50 oranges – this system starts to falter.
To correct this, traders may wish to provide more apples and oranges to this system, providing buyers and sellers with the necessary liquidity to complete their trades. Naturally, they take a small fee for providing the goods (or capital) to facilitate market operations. This very system underpins liquidity within every single market. Within foreign exchange alone, the daily trading volume is over USD$6.6T per day – this highlights the importance of ensuring markets remain liquid.
In traditional markets, this task has become the role of major financial institutions who wield an iron grip over these very markets, opening them to abuse and manipulation. Within the cryptosphere, things are different. DeFi allows anyone to participate within the operations side of the market and set their capital to work for them rather than leaving it to remain dormant.
Within the world of DeFi, all of the varied avenues form one simple yet important task – ensuring the exchange has the capital and ability to function. Simply put, DeFi forms the lifeblood of a healthy market.
onAVAX is a DeFi platform like no other. Swapsicle and onXRP built onAVAX to empower XRPL-native asset holders to engage within the DeFi space and put dormant capital to use. For the first time in the history of XRP, holders can now use their tokens to generate income. onAVAXs is the key to unlocking the previously untapped value XRP within the world of DeFI. onAVAX allows XRPL-native assets all well as Avalanche-native assets to come together to further both communities’ advancement within the crypto-sphere.
Swapsicle and onXRP set out to solve one of blockchain’s biggest challenges – silo operations. Together, we have achieved this goal and onAVAX brings interoperability, collaboration, and financial opportunities to both chains by creating the onAVAX platform and their $OVX token. $OVX introduces an avenue for the community to enter the EVM capabilities of Avalanche with confidence and ease.
onAVAX leverages the Avalanche (AVAX) protocol in collaboration with Multichain to bridge assets between protocols. This allows XRPL asset holders to bridge onto the EVM-compatible AVAX chain and set their XRPL assets to work within onAVAXs varied DeFi applications to finally fully utilise their holdings.
All projects listed by onXRP will have the ability to bridge their native tokens to the onAVAX ecosystem, utilising the bridge built by multichain.
Let’s now have a look at onAVAX and its multifaceted DeFi platform. Click here to be re-directed to the onAVAX DeFi module.
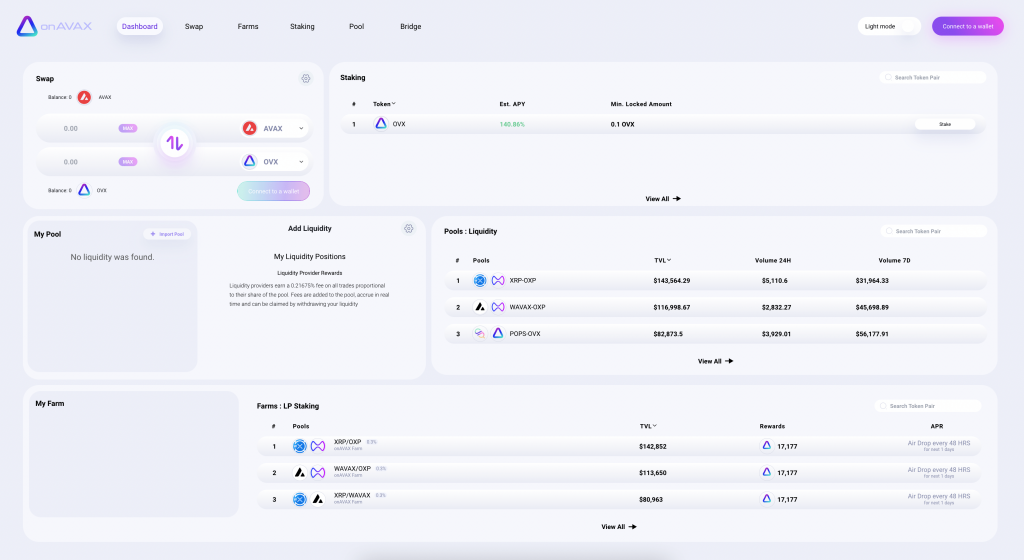
Dashboard
The dashboard is the main page for onAVAX, this page displays an overview of everything going on within the platform. Each application is subdivided to present a clear overview of key metrics which can be viewed in more detail by going to their dedicated sections (e.g. ‘Farms’).
To get started, let’s first visit the bridge section.
Bridging Assets
To comprehend the central premise behind this process, you will first need to understand the difference between blockchains that run on the Ethereum Virtual Machine (hereinafter referred to as EVM) and blockchains that are non-EVM compliant. Why you may wonder? Avalanche uses EVM on its C-Chain to construct and enable smart contracts which means it is fully compatible with the Ethereum network (and therefore supported by wallets such as MetaMask). The XRPL on the other hand is a non-EVM compliant blockchain. It, therefore, is not compatible with EVM-supporting wallets such as MetaMask & WalletConnect. For the transfer of tokens to occur from one blockchain to another a ‘bridge’ is required.
The Multichain bridge allows just this and we will explain to you exactly how to transfer tokens from one blockchain to another in the following paragraphs.
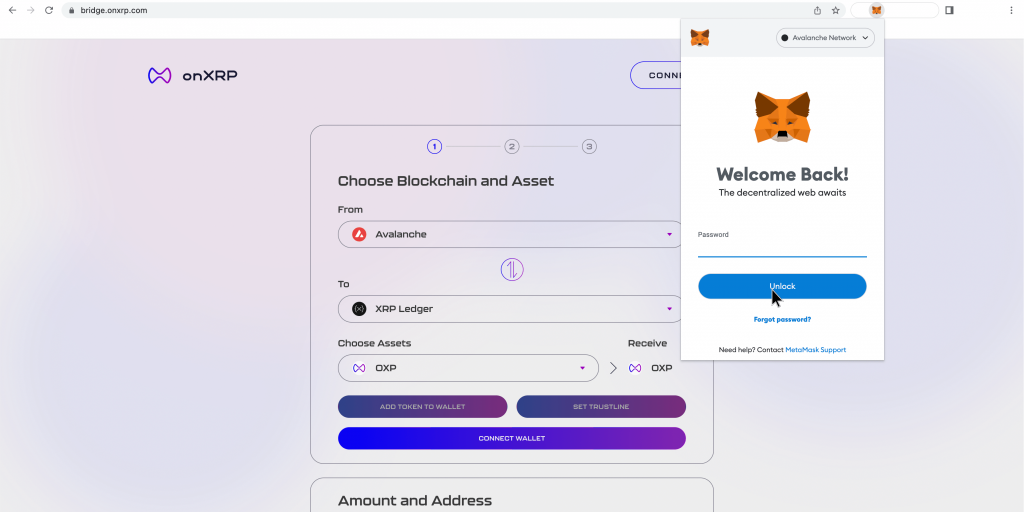
Before starting the process you will need to download & install MetaMask’s web wallet. Follow the instructions that will be prompted to you and please keep your keys and password in a safe place so that you do not lose your funds. Once the installation and activation processes are complete you should see the MetaMask logo in your browser’s extensions (e.g. for Google Chrome it should pop up in the top right corner).
Although the following part of the process is done automatically when you connect your MetaMask (or WebWallet) on https://bridge.onxrp.com, we believe it is important for everyone to understand how to add networks to their web wallets. In our case, we will be adding the Avalanche network. This will allow you to add AVAX-native tokens to your MetaMask wallet and bridge them over to the XRPL (and vice versa). Follow the instructions here and you should be able to add the network without any difficulties. Now that you have integrated your MetaMask wallet in your browser and added the Avalanche network, you will need to send some AVAX to your wallet. 1 AVAX should be plenty to use the bridge freely (as you will see in step 9). Sending AVAX to your MetaMask can be done through most (de)central exchanges. Here, you can find how to do so using Binance as an example. Head over to https://bridge.onxrp.com. This page will direct you to our bridge extension where you will be able to follow the subsequent 12 steps where we will be bridging OXP:
How to Bridge Tokens
1) Press the MetaMask icon in the top right of your browser and you will be prompted to log into your MetaMask using the password you created earlier.
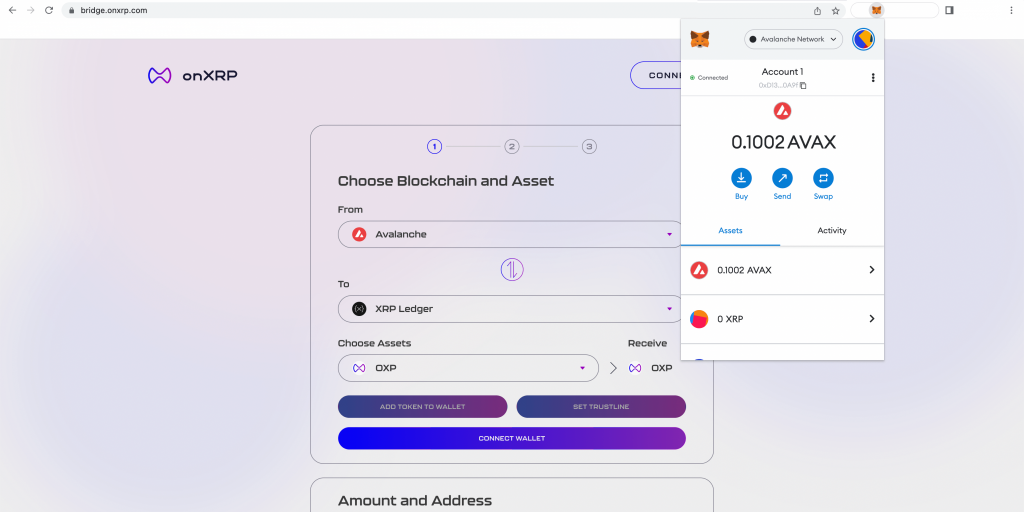
2) Once you have logged in, you will need to select the Avalanche Network at the top of the MetaMask popup. Once this is done, you will be able to see the native AVAX tokens you have acquired in the past (if you have acquired any) in your MetaMask wallet.
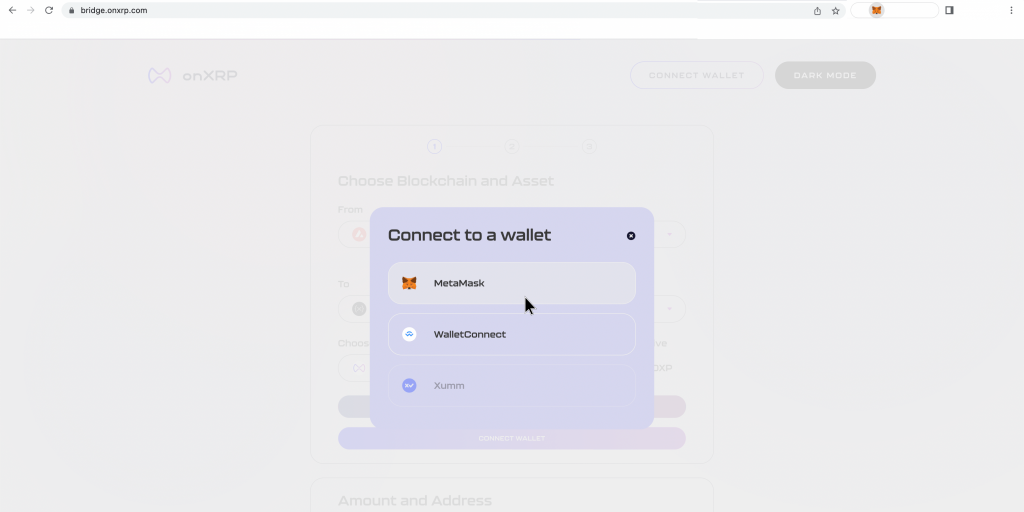
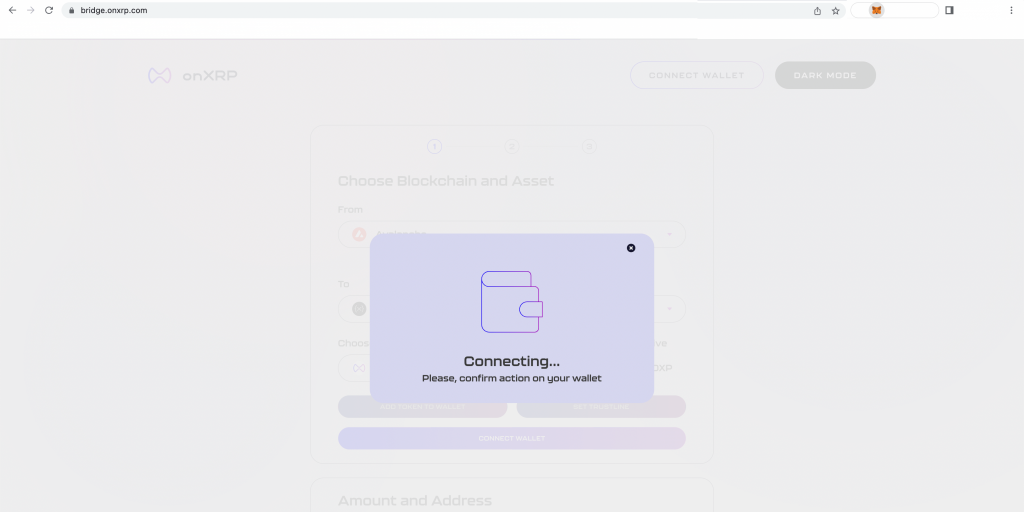
3) To connect your wallet to the bridge interface, press connect wallet (as seen in the picture below). This will open a popup window where you will be able to select the appropriate wallet. In our case, it is the MetaMask wallet.
4) The interface will connect to the MetaMask interface (this should not take longer than a few seconds). If it takes longer than that, refresh the page and try again.
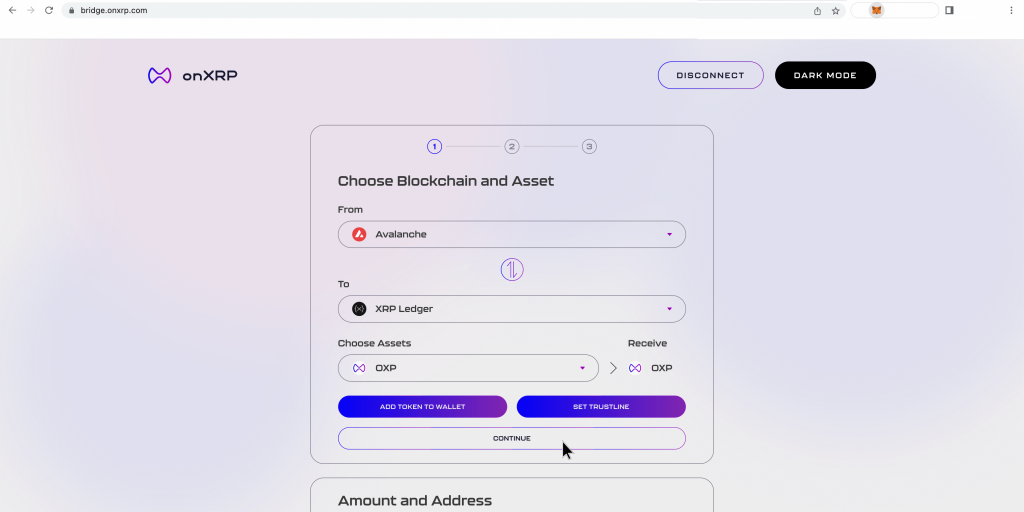
5) Now that your MetaMask wallet has been connected, you can proceed by pressing the ‘Continue’ button.
If you are trying to bridge an XRPL token to Avalanche press the swap arrows between the two chains (if you wish to bridge OXP, ensure that you first add the OXP token to your MetaMask by pressing the ‘Add Token to Wallet’). This will immediately add the token to your web wallet.
To proceed after this you will need to connect your XUMM wallet by pressing ‘Connect’ in the top-right corner. Scan the QR code and sign the transaction on your XUMM application.
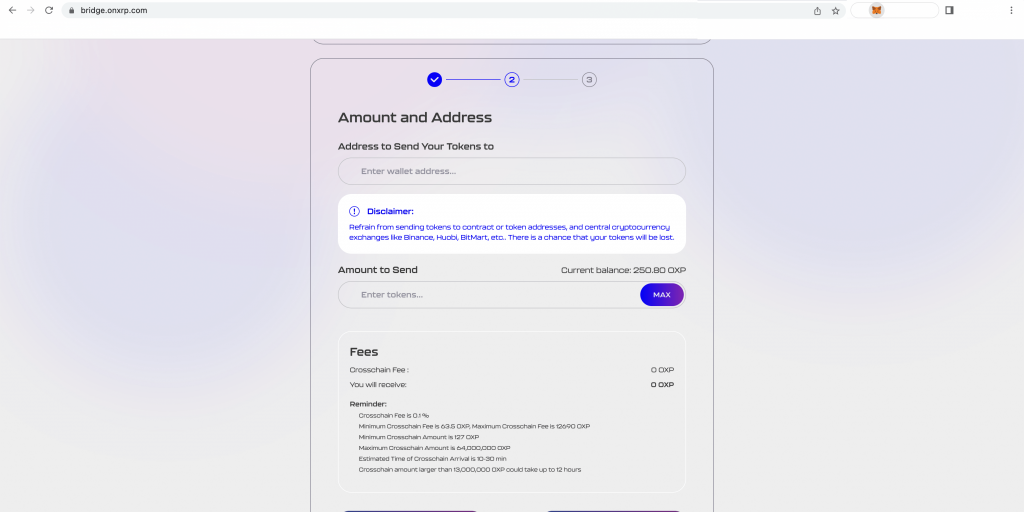
6) You will be directed to step 2. Please read the disclaimer, as bridging tokens to central exchanges & contract/token addresses could result in a loss of funds.
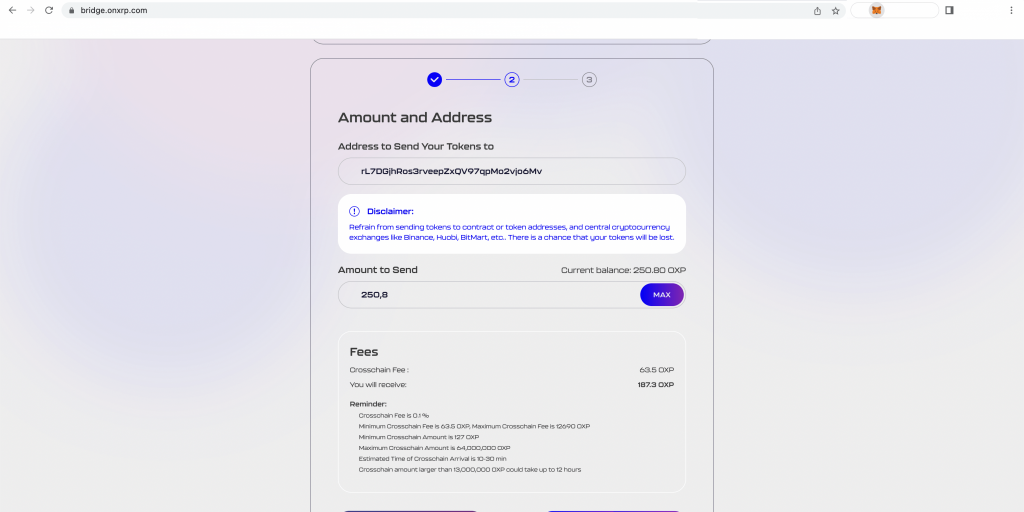
7) If you are bridging from Avalanche to the XRPL, open the XUMM application on your mobile device, copy your XUMM wallet address and paste it into the top field (as seen below). If you would like to know more about this, click here.
If you are bridging from the XRPL to the Avalanche network, copy the Avalanche wallet address from your MetaMask and paste it into the top field. If you would like to know how to copy this address, click here.
It is essential that you double-check that you have placed the correct wallet address into that field (i.e. do not paste an Avalanche network address in that field if you are planning to bridge to the XRPL).
Once the wallet address is inserted, you can enter the token amount that you wish to transfer.
In our example (bridging from Avalanche to the XRPL), the minimum cross-chain fee is 63.5 OXP. In our example, this means that sending 250.8 OXP will bridge 187.3 OXP to your XUMM wallet.
8) Once you are satisfied with the amount and understand the fees attributed to the transaction, press ‘Send’.
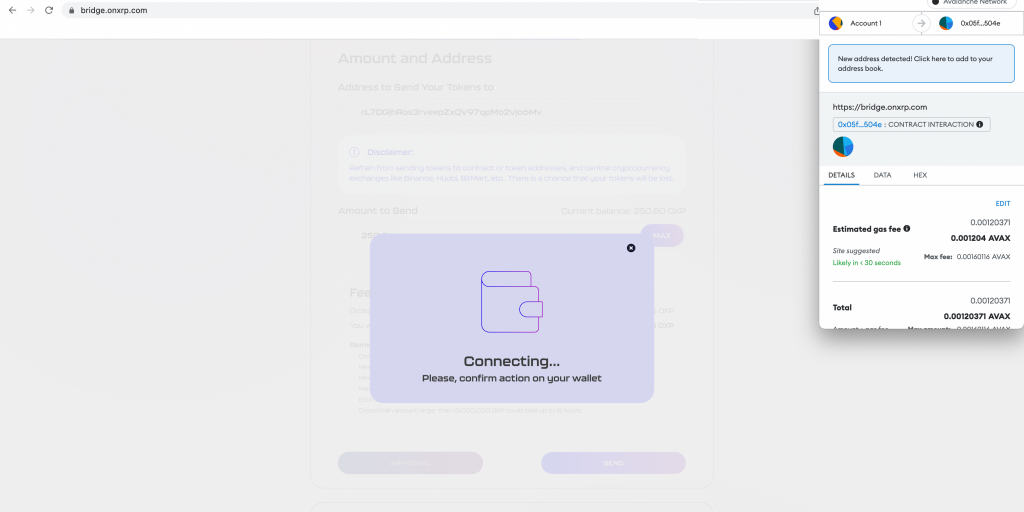
9) Since you are bridging from the Avalanche Network to the XRPL, this action will open your MetaMask wallet again in which an estimated gas fee will be displayed.
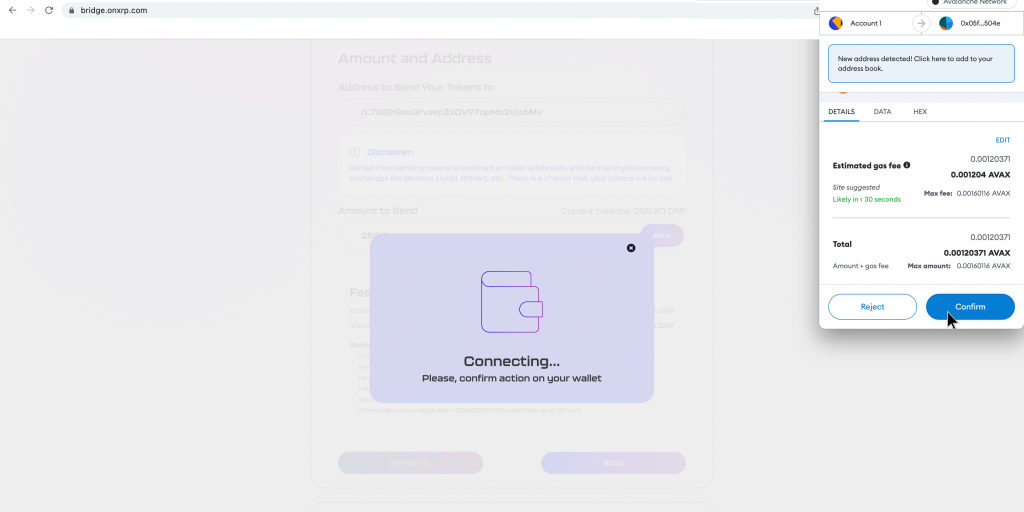
10) Scroll down the MetaMask menu popup and, if you agree with the gas fee, hit confirm to initiate the bridging transaction.
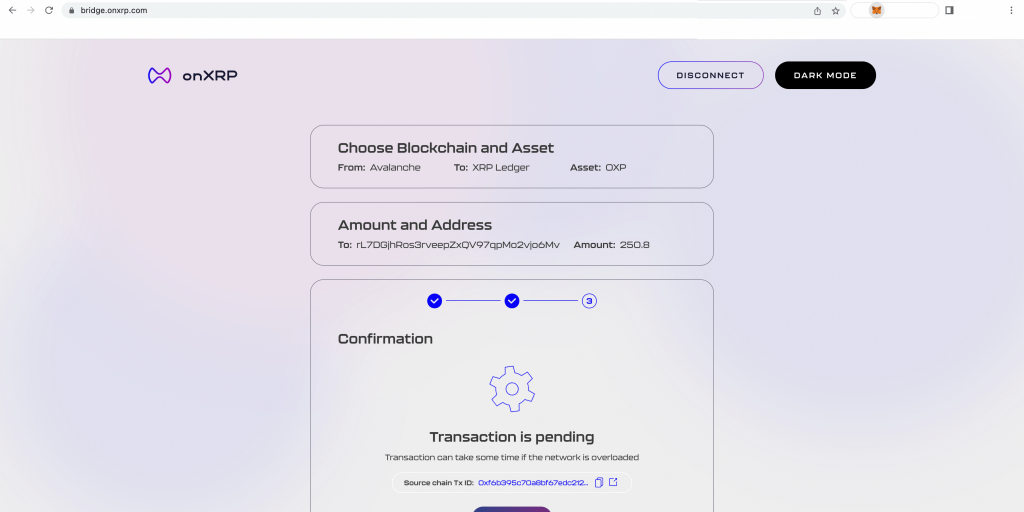
11) Now that the bridging transaction has been initiated, you will have to wait until the token has been bridged from one network to the other. This may take some time depending on how many transactions are being processed at that moment in time. To check on your transaction, copy Source Chain Tx ID and head over to: https://anyswap.net/. Paste the copied ID into the search bar. This will allow you to find the status of your transaction.
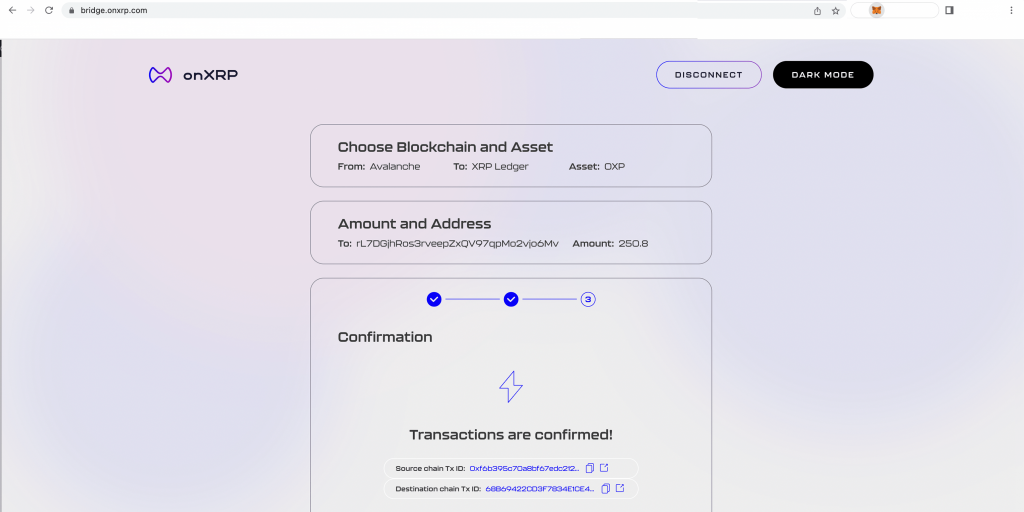
12) Your transaction has now been confirmed. You have now acquired OXP back into your XUMM wallet and can bridge tokens again.
Multichain offers hands-on support. If you encounter any issues, head over to this link here.
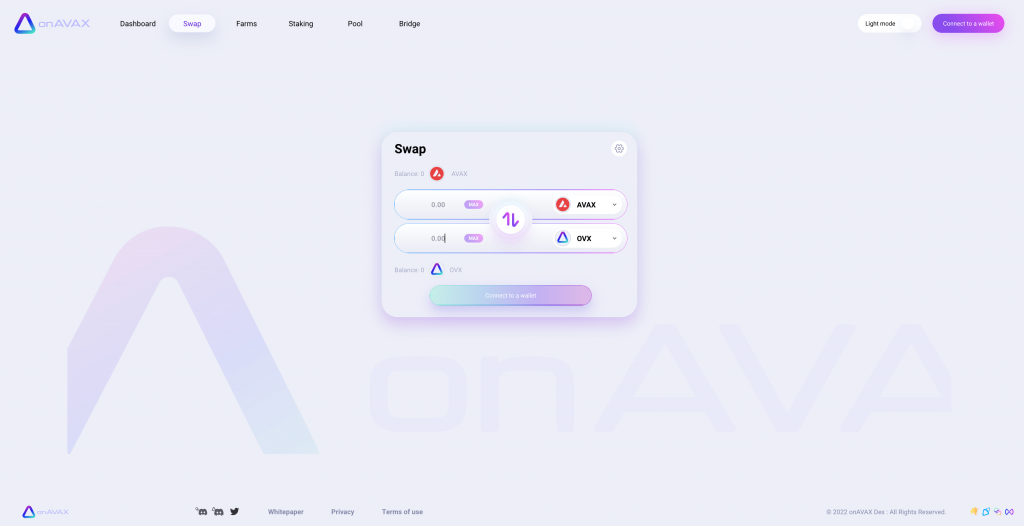
Swap
The swap function within onAVAX is a feature that alone marks one of the greatest revolutions within finance. Gone are the days of selling out into fiat to buy back in, Swapping allows you to convert something to something. Using the apples and oranges example from earlier, the swap function simply allows you to swap an apple for an orange.
Cryptocurrencies within the context of the swap tool are functionally the same as regular currency pairs such as the USD/EUR; the swap function in its simplest form is just a method for users to exchange one asset for another.
The Swap tool allows you to convert any onAVAX listed asset into another. A small fee is charged when you swap and this is paid to liquidity providers for facilitating this transaction.
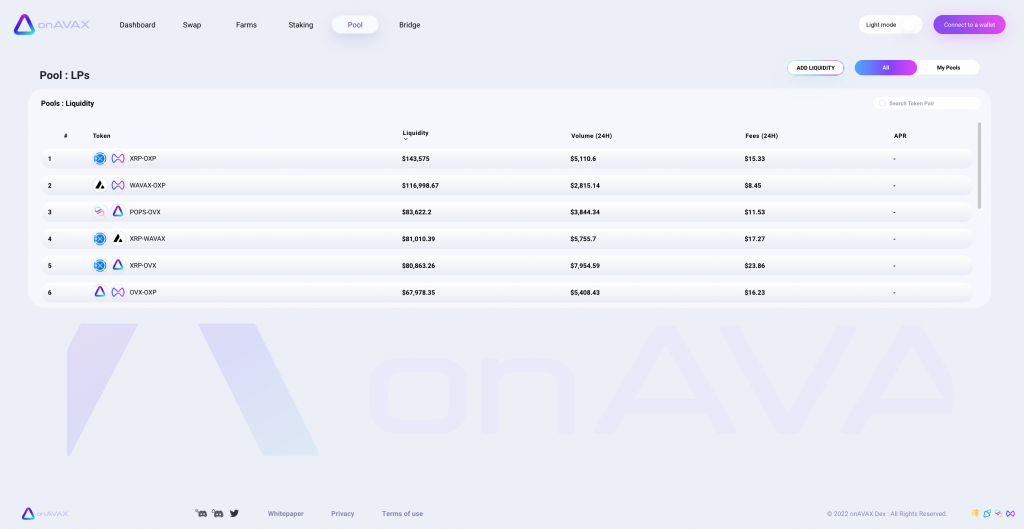
Pool
Liquidity pools or LPs allow you to become the market maker, using the example of apples/oranges in this case you supply equal dollar amounts of both apples and oranges to facilitate others to trade across this liquidity pair.
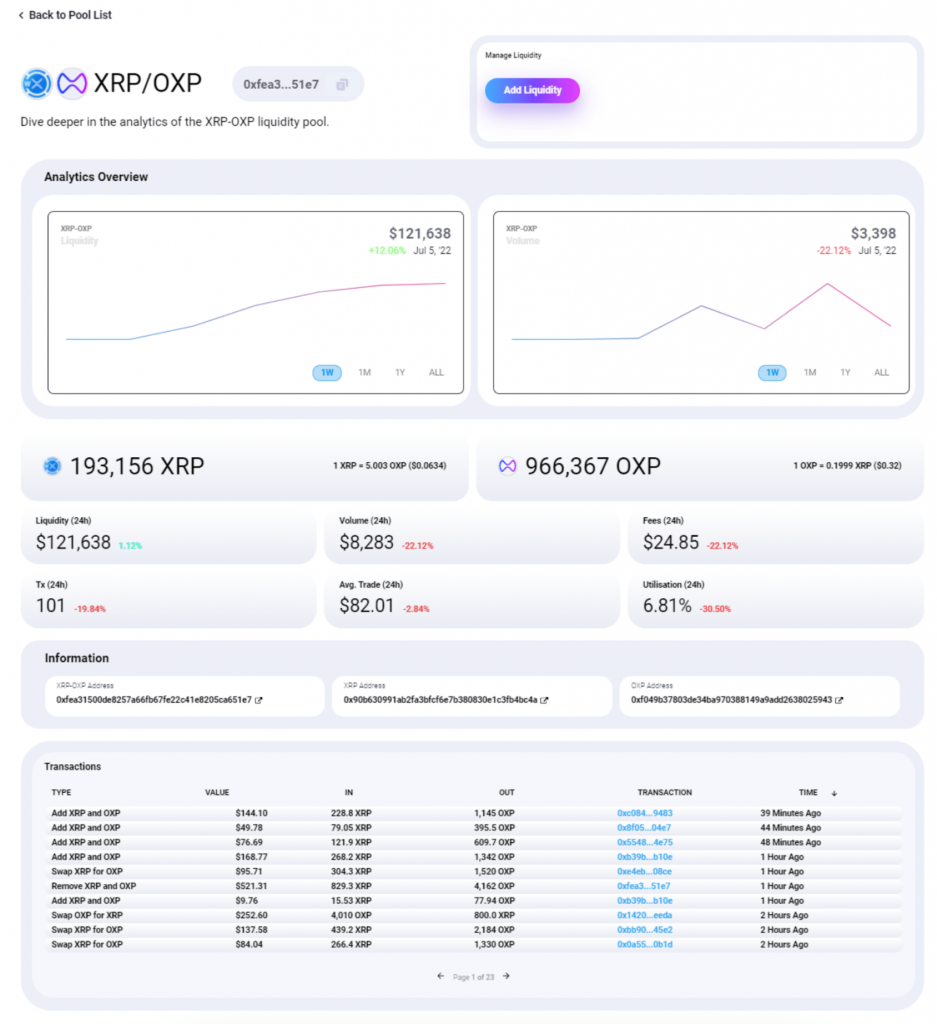
By providing liquidity, holders provide that pair with liquidity. LPs must be balanced on dollar amounts rather than just tokens. Let’s say $XRP was worth $1 and $OXP was worth $0.50 to balance this LP we would need 1 XRP and 2 OXP tokens. To dive deeper into pool analytics, simply click on the desired pair to view a much more detailed look.
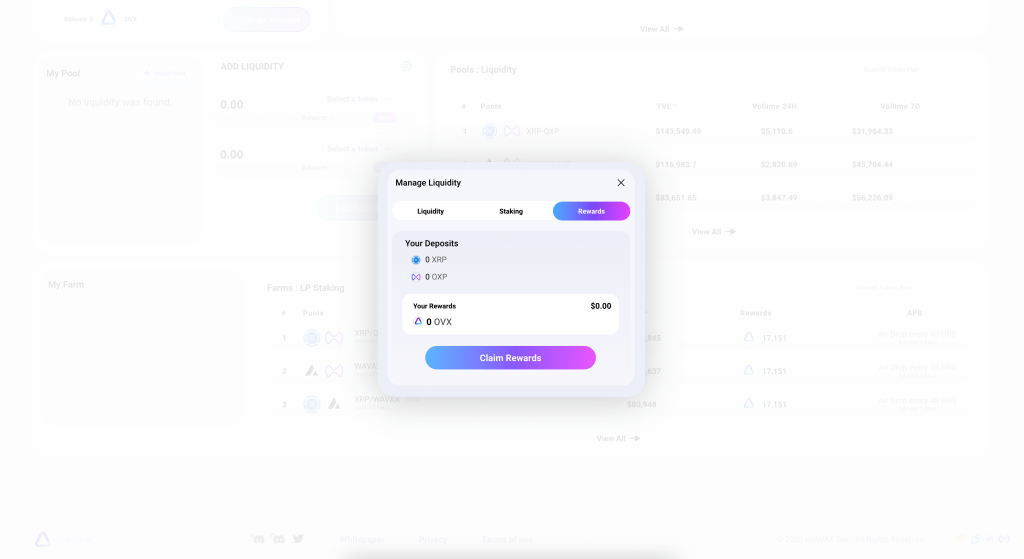
As an incentive for providing liquidity LP providers earn a 0.21675% fee on all trades proportional to their share of the pool, fees are added to the pool, accrue in real-time, and can be claimed by withdrawing your liquidity.
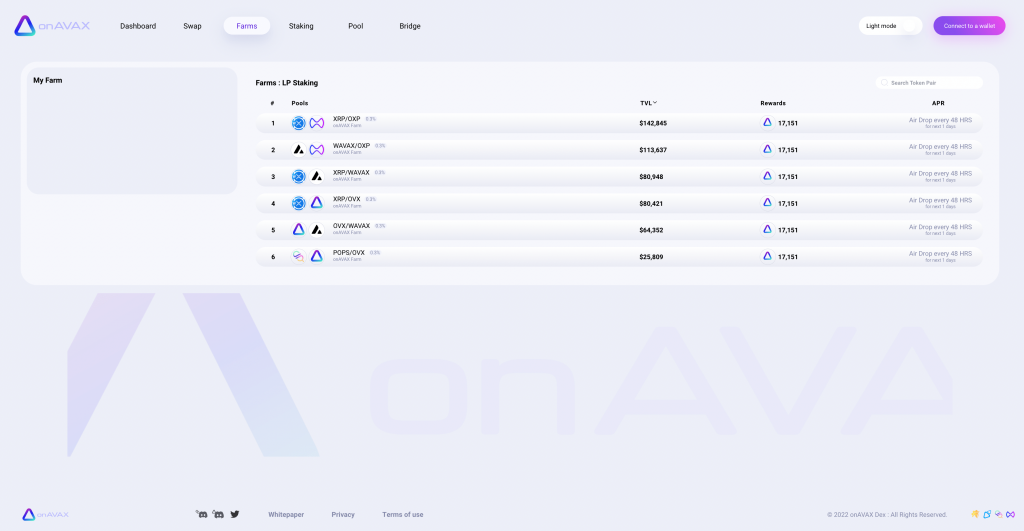
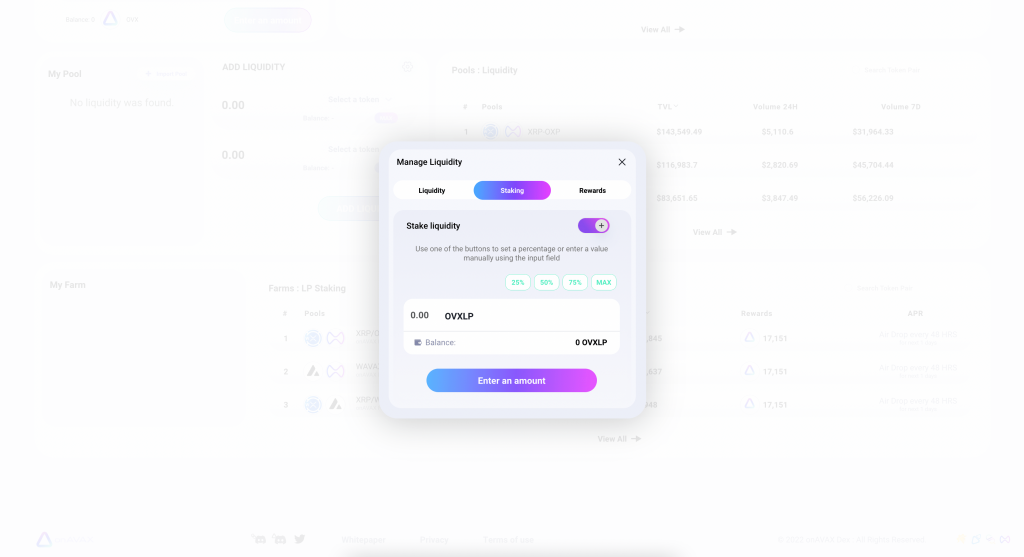
Farms
Farms (or Yield farms) can be seen as an extension of the liquidity pool (LPs). Once token holders have provided liquidity via a pool, they gain access to LP tokens which can be staked within the farms. This allows LP providers to gain even more rewards for providing liquidity.
To utilise the farm function after providing liquidity to a pool, simply go to the ‘Farms’ section and select a supported farm pair to bring up the manage liquidity dashboard.
To stake within a farm, enter the ‘Staking’ section and select the percentage of tokens you wish to stake. This will provide you with LP tokens within this farm, from this you will receive rewards in the form of the $OVX token – more information regarding the $OVX token can be found within the onAVAX lightpaper.
To collect your rewards, simply press collect rewards and you’ll receive $OVX tokens as a reward. To compound the returns from the farm you can use the swap function to convert your OVX profits into the assets which make up your farm. Another option is to add your $OVX tokens to the ‘Staking’ section of onAVAX to diversify your holdings.
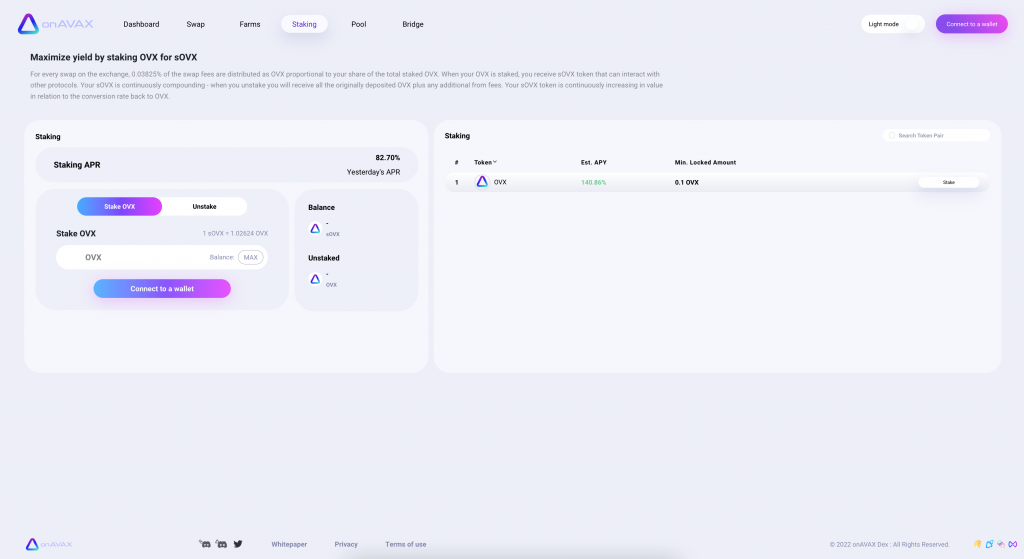
Staking
For those who want to stake their $OVX tokens, head to the ‘Staking’ section.
Staking allows users to generate passive income from percentages of swap fees. For every swap within the exchange, $OXP stakers receive 0.03825% proportional to your their of the total staked $OVX. Staking allows your $OXP generate rewards which can be compounded to generate even more $OVX. To compound returns, enter the desired amount of $OVX tokens you want to stake and they’ll be added to your staked balance. If you wish to unstake you’ll receive all the originally deposited $OVX tokens plus any additional tokens via fees.
Further information
Further information about onAVAX can be found on our Twitter where the team and community will answer any questions you may have.
Charlie Wooding
With a background in finance and politics, Charlie brings new opportunities to the team though his experience as an elected government official. He provides political expertise which gives a valuable insight into the the direction of the industry and regulatory developments. Charlie’s perspectives have addressed and helped to solve fundamental problems of the current NFT market to take onXRP to new heights.
We use cookies on our website to give you the most relevant experience by remembering your preferences and repeat visits. By clicking “Accept All”, you consent to the use of ALL the cookies. However, you may visit "Cookie Settings" to provide a controlled consent.
This website uses cookies to improve your experience while you navigate through the website. Out of these, the cookies that are categorized as necessary are stored on your browser as they are essential for the working of basic functionalities of the website. We also use third-party cookies that help us analyze and understand how you use this website. These cookies will be stored in your browser only with your consent. You also have the option to opt-out of these cookies. But opting out of some of these cookies may affect your browsing experience.
Necessary cookies are absolutely essential for the website to function properly. These cookies ensure basic functionalities and security features of the website, anonymously.
Cookie
Duration
Description
cookielawinfo-checkbox-analytics
11 months
This cookie is set by GDPR Cookie Consent plugin. The cookie is used to store the user consent for the cookies in the category "Analytics".
cookielawinfo-checkbox-functional
11 months
The cookie is set by GDPR cookie consent to record the user consent for the cookies in the category "Functional".
cookielawinfo-checkbox-necessary
11 months
This cookie is set by GDPR Cookie Consent plugin. The cookies is used to store the user consent for the cookies in the category "Necessary".
cookielawinfo-checkbox-others
11 months
This cookie is set by GDPR Cookie Consent plugin. The cookie is used to store the user consent for the cookies in the category "Other.
cookielawinfo-checkbox-performance
11 months
This cookie is set by GDPR Cookie Consent plugin. The cookie is used to store the user consent for the cookies in the category "Performance".
viewed_cookie_policy
11 months
The cookie is set by the GDPR Cookie Consent plugin and is used to store whether or not user has consented to the use of cookies. It does not store any personal data.
Functional cookies help to perform certain functionalities like sharing the content of the website on social media platforms, collect feedbacks, and other third-party features.
Performance cookies are used to understand and analyze the key performance indexes of the website which helps in delivering a better user experience for the visitors.
Analytical cookies are used to understand how visitors interact with the website. These cookies help provide information on metrics the number of visitors, bounce rate, traffic source, etc.
Advertisement cookies are used to provide visitors with relevant ads and marketing campaigns. These cookies track visitors across websites and collect information to provide customized ads.